| Quest name | Level | Action | Walkthrough available |
|---|---|---|---|
| Dark Knowledge Part of: 3 | 0 | More info | |
| Tears of the Two Moons Part of: Temple of the Mourning Springs Objective | 3 | More info | |
| The Family Business | 3 | More info | |
| Cast Adrift Part of: Shattered Shoals Objective | 4 | More info | |
| Moon-Sugar Medicament Part of: Hazak’s Hollow Objective | 4 | More info | |
| The Root of the Problem | 4 | More info | |
| The Tempest Unleashed Part of: Cat’s Eye Quay | 5 | More info | |
Author Archives: Serge
Auridon Quest Locations
| Quest name | Level | Action | Walkthrough available |
|---|---|---|---|
| Lifting the Veil Part of: Skywatch Objective | 0 | More info | |
| A Hostile Situation | 6 | More info | |
| Aicessar’s Invitation | 6 | More info | |
| Curinure’s Invitation | 6 | More info | |
| Ensuring Security Part of: Vulkhel Guard Objective | 6 | More info | |
| New in Town | 6 | More info | |
| Unaccounted Crew | 6 | More info | |
| Anchors from the Harbour | 7 | More info | |
| Corruption Stones | 7 | More info | |
| In the Name of the Queen Part of: Tanzelwil | 7 | More info | |
| One of the Undaunted | 7 | More info | |
| Real Marines Part of: Silsailen | 7 | More info | |
| Teldur’s End Part of: Silsailen | 7 | More info | |
| The First Patient Part of: Phaer Objective | 7 | More info | |
| The Serpent’s Beacon | 7 | More info | |
| To Tanzelwil Part of: Tanzelwil | 7 | More info | |
| Long Lost Lore | 8 | More info | |
| Plague of Phaer Part of: Phaer Objective | 8 | More info | |
| Rites of the Queen Part of: Tanzelwil | 8 | More info | |
| Silsailen Rescue Part of: Silsailen | 8 | More info | |
| The Racer | 8 | Full Guide | |
| To Mathiisen Part of: Mathiisen Objective | 8 | More info | |
| Depths of Madness Part of: Glister Vale Objective | 9 | More info | |
| Putting the Pieces Together Part of: Mathiisen Objective | 9 | More info | |
| The Unveiling Part of: Mathiisen Objective | 9 | More info | |
| To Skywatch | 9 | More info | |
| Assisting the Assistant | 10 | More info | |
| Final Blows | 10 | More info | |
| Repentant Son | 10 | More info | |
| The Veil Falls Part of: Skywatch Objective | 10 | More info | |
| Quest name | Level | Action | Walkthrough available |
|---|---|---|---|
| To Dawnbreak Part of: Dawnbreak Objective | 10 | More info | |
| Wearing the Veil Part of: Skywatch Objective | 10 | More info | |
| A Village Awakened Part of: Shattered Grove Objective | 11 | More info | |
| An Act of Kindness Part of: Ezduiin Objective | 11 | Full Guide | |
| Breaking the Barrier Part of: Firsthold Objective | 11 | More info | |
| Preventative Measure | 11 | More info | |
| Silent Village Part of: Shattered Grove Objective | 11 | More info | |
| Simply Misplaced | 11 | More info | |
| The Dangerous Past | 11 | More info | |
| The Mallari-Mora | 11 | More info | |
| The Toothmaul Ploy Part of: Toothmaul Gully Objective | 11 | More info | |
| The Veiled Choice Part of: Quendeluun Objective | 11 | More info | |
| Through the Ashes Part of: Dawnbreak Objective | 11 | More info | |
| Well-Armed Savages Part of: Toothmaul Gully Objective | 11 | More info | |
| Altmeri Relic | 12 | More info | |
| Blessings of the Eight | 12 | More info | |
| Eye Spy Part of: North Beacon Objective | 12 | More info | |
| Harsh Lesson Part of: College of Aldmeri Propriety Objective | 12 | More info | |
| Spirited Away | 12 | More info | |
| The Wayward Dagger Part of: North Beacon Objective | 12 | More info | |
| Banishing the Banished | 13 | More info | |
| Eye of the Ancients Part of: Greenwater Cove Objective | 13 | Full Guide | |
| Rightful Inheritance Part of: Castle Rilis Objective | 13 | More info | |
| Sever All Ties Part of: Firsthold Objective | 13 | More info | |
| The Great Tree | 13 | More info | |
| Take Me Home | 14 | More info | |
| The Jester’s Joke | 15 | More info | |
Bleakrock Isle Quest Locations
Bal Foyen Quest Locations
Stonefalls Quest Locations
| Quest name | Level | Action | Walkthrough available |
|---|---|---|---|
| A Son’s Promise Part of: Crow’s Wood Objective | 5 | More info | |
| Decree of the Court | 5 | More info | |
| City Under Siege | 6 | More info | |
| Delaying the Daggers | 6 | More info | |
| Hilan’s Invitation | 6 | More info | |
| Legacy of the Ancestors | 6 | More info | |
| Percussive Ranching | 6 | More info | |
| Proving Trust Part of: Senie Objective | 6 | More info | |
| Quiet the Ringing Bell | 6 | More info | |
| Rudrasa’s Invitation | 6 | More info | |
| Through the Aftermath Part of: Starved Plain Objective | 6 | More info | |
| Wayward Son Part of: Starved Plain Objective | 6 | More info | |
| Close the Scamp Caves Part of: Ash Mountain Objective | 7 | More info | |
| Desperate Souls | 7 | More info | |
| In With the Tide | 7 | More info | |
| Mystery of Othrenis | 7 | More info | |
| Quieting a Heart | 7 | Full Guide | |
| Rending Flames Part of: Othrenis Objective | 7 | Full Guide | |
| Restoring the Guardians | 7 | More info | |
| Suspicious Silence Part of: Fort Arand Objective | 7 | More info | |
| The Death of Balreth Part of: Ash Mountain Objective | 7 | Full Guide | |
| To Ash Mountain | 7 | More info | |
| Wake the Dead Part of: Othrenis Objective | 7 | More info | |
| Ebonheart Anchors from the Harbour | 8 | More info | |
| The Venom of Ahknara Part of: Fort Arand Objective | 8 | More info | |
| The Brothers Will Rise | 9 | More info | |
| Window on the Past Part of: Brothers of Strife Objective | 9 | More info | |
| A Bit of Sport | 10 | More info | |
| A Goblin’s Affection | 10 | More info | |
| Cleansing the Past | 10 | More info | |
| Quest name | Level | Action | Walkthrough available |
|---|---|---|---|
| Ebonheart Long Lost Lore | 10 | More info | |
| Night of the Soul Part of: Ebonheart Objective | 10 | More info | |
| Peril at the Pools Part of: Sulfur Pools Objective | 10 | More info | |
| Recovering the Guar | 10 | Full Guide | |
| Restoring Order | 10 | More info | |
| Taking the Tower | 10 | More info | |
| The Coral Heart Part of: Vivec’s Antlers Objective | 10 | More info | |
| The Sapling | 10 | Full Guide | |
| The Truth about Spiders | 10 | More info | |
| To Fort Virak | 10 | More info | |
| A Story Told in Footprints | 13 | More info | |
| An Unwanted Twin Part of: Sathram Plantation Objective | 13 | More info | |
| Savages of Stonefalls | 13 | More info | |
| Shattering Mirror Part of: Sathram Plantation Objective | 13 | More info | |
| Waylaid Wine Merchant | 13 | More info | |
The Banished Cells Dungeon Playthrough
During the February beta session we managed to go through level 12-15 dungeon called The Banished Cells. Dungeon is located in Auridon and has 5 bosses. I took a video of one of our run-throughs for our own collection, because at the time the NDA was still in place, but now that the NDA has lifted we decided to add some commentary and share it with the world. We didn’t manage to finish the whole instance due to one of the group members leaving before the last boss, but you can see what grouping in Elder Scrolls online looks like. We’ll update this post with full HD video and full guide on how to defeat all bosses in this instance. DISCLAIMER: footage bellow was made during a beta weekend and it might differ from what we’ll see at release of the game.
Where Magical Paths Meet Lorebook
| Collection: | Dungeon Lore |
| Location(s): | Glenumbra |
| Location Notes: | Found about half way through the group dungeon Spindleclutch. We marked the location of the entrance into the dungeon as the location of this shard in Glenumbra. There is a screenshot showing the exact location inside the dungeon itself. |
| Image walkthrough: | |
| Map: | 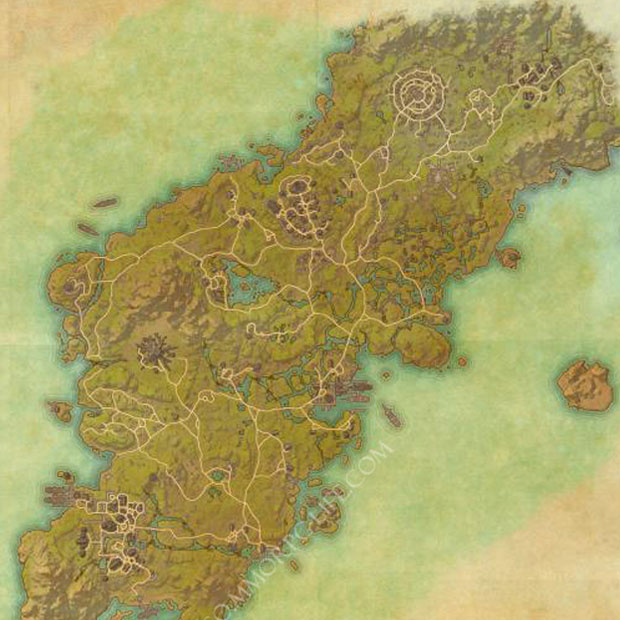 |


Lorebook text
By Warlock Aldaale
Mastering Conjuration means having access to an entire spectrum of utility.
—Are you in need of a flame spell? Conjure a Flame Atronach. You’ll have command of a dozen such spells, in the form of a fiery avatar.
—Are you caught in the dead of night and wishing you had prepared a light spell? Conjure a Will-o-the-Wisp: its natural luminescence banishes darkness.
—Do you lack a telekinesis spell to move a boulder out of your way? Conjure a Storm Atronach to lift it for you.
—Did you forget the shield ward you’ll need to protect yourself from a sudden hail? Conjure a Frost Atronach to crystallize the air above for temporary shelter.
—Is your life detection spell unable to discern a fleeing target from all the other living things in the wilderness? Conjure a Wolf Familiar to pick up the scent.
The flexibility of Conjuration magic has been an unsung passion of mine, and I’ve compiled a comprehensive guide for replacing specific, commonly-used spells with Conjuration substitutions (see Volume II, page seven, for more).
Conjuration even allows access to Daedric abilities (for those who dare to wield them). A mage well-versed in Conjuration can summon all variety of Daedra, from Scamps to Dremora Lords. Mine wouldn’t be the first primer for spells like these, but Volume III of this collection contains detailed instructions on beckoning the denizens of Oblivion. "The Origins of Conjuration" is also a useful read on the subject.*
I realize I write highly of Conjuration here, almost extravagantly, but if you’ll do me the favor of reading the rest of this collection (Volumes II-XXII), you’ll find that my words have weight.
*Author’s Note: It should go without saying, but contact the Oblivion planes only with the utmost discretion: the unwary mage could lose her life—or worse—in dealings with the Daedra.
With Regards To The Ebony Blade Lorebook
| Collection: | Dungeon Lore |
| Location(s): | Stonefalls |
| Location Notes: | Inside Fungal Grotto – 4 man dungeon. Entrance to Fungal Grotto is in western Stonefalls. You can simply press the Fungal Grotto Map Icon from another map. This saves from running to the entrance. |
| Image walkthrough: | |
| Map: | 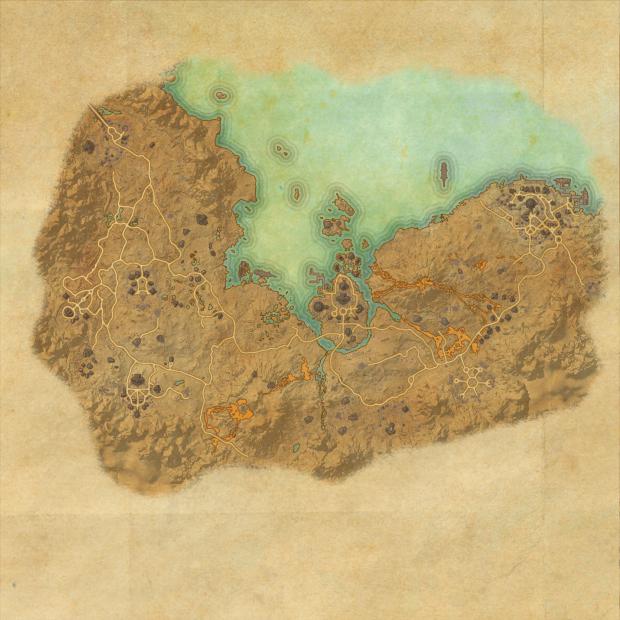 |


Lorebook text
The following is an intercepted Morag Tong memorandum in full, noted here for conjecture on the Daedric artifact Ebony Blade:
Before I begin, let me preface by stating: the Daedric Prince Mephala and her worshippers value arcanum above all else—you will learn this, in time. To Hermaeus Mora, knowledge is power, but Mephala concerns herself with only the choicest morsels: knowledge secluded, undisclosed.
The various Daedric artifacts associated with Mephala share this disposition, chief among them, the Ebony Blade, of which little is known. The records of the Tong themselves disagree on the properties locked within the Blade’s metal. But I’ll share what I know about it, and in return, you will complete your first assignment for the guild. I hope you’ll find the Flowers of Gold as a suitable base of operations. Your room is a favorite of mine. Warm and dry.
First: the Blade initially passed into the Morag Tong’s notice (this decade, at least) when our brother Orndras obtained it, taking it from Rivis, another brother. Rivis had the Blade kept in a safehouse for years, hidden from his fellow Morag Tong. How did Orndras find Rivis out? He’ll take that secret to his grave, but his handlers whispered that the Web Spinner herself had told him. Even the Tong is unsure how the Blade is connected to Mephala, whether it is an extension of her physical form, or if her essence is bound to it, but it’s important to her. And that makes it important to us.
Second: Rivis was a keen magic user. One of the Tong’s most powerful. And he was not about to allow Orndras to leave his safehouse with the Ebony Blade in tow. There was a duel between them, and when Orndras drew first blood with the Blade—and failed to kill—he was surprised Rivis did not engulf him in a fiery spell. It’s possible the Blade can stymie the flow of magicka in a body, or simply absorb it.
Third: Rivis was keen with an edge, and better skilled than Orndras. But Orndras wielded the Ebony Blade, and the wounds he suffered stitched themselves together as the battle continued—as Orndras dealt his less-precise cuts. Perhaps a restorative property of the Blade.
Fourth: Rivis’ last words were, "The Vampire will be the end of us all." Orndras believed he was referring to the Blade, that Rivis had hidden it out of legitimate fear. I believe that even the most venerable of the Morag Tong will say anything when backed into a corner. I have.
Fifth: Orndras retrieved the Blade, made a detailed report to his handlers—and then attempted to slaughter them. He murdered all but one. His actions had no discernible rhyme or reason or motive, and he was last seen on the third floor of the Flowers of Gold.
Return the Ebony Blade to us, whether Orndras comes with it or not. Look for a Dunmer with a scar under his left eye.
Guide To The Daggerfall Covenant Lorebook
| Collection: | Glenumbra Lore |
| Location(s): | Glenumbra |
| Location Notes: | Found in the Beldama Wyrd Tree area, which you’ll come across during the quest "Reclaiming the Elements". It is next to some small sleeping tents. |
| Image walkthrough: | |
| Map: | |


Lorebook text
The Daggerfall Covenant is a compact between the peoples of northwest Tamriel—Bretons, Redguards, and Orcs—that forms an alliance of mutual defense, with a vision of establishing peace and order across Tamriel. Indeed, the kings of the Covenant take the Remans as their model, claiming to be the spiritual heirs of the Second Empire.
The Daggerfall Covenant was born in 2E 542, when the kings of High Rock allied to repulse an invasion by a horde of Reachmen under the command of Durcorach, "the Black Drake." Howling out of the eastern mountains, the Reach barbarians razed Evermore, besieged Wayrest, sacked Camlorn, and marched as far as the gates of Daggerfall before the Bretons finally stopped them. In the wake of Durcorach’s defeat, the kings of Daggerfall, Wayrest, Camlorn, Evermore, and Shornhelm swore the so-called "first" Daggerfall Covenant, a solemn oath to defend each other’s kingdoms and stand as one against all foreign foes.
High Rock prospered as the Bretons rebuilt, especially after 2E 561, when miners near Wayrest made the biggest orichalcum strike in recorded history. Emeric, Earl of the domain of Cumberland, the site of the mines, proposed to use the resulting wealth to enhance Wayrest’s fleet and improve trade throughout High Rock. King Gardner of Wayrest granted his approval, but before the fleet was completed, the dreaded Knahaten Flu swept through Wayrest and killed the entire Gardner royal household. Earl Emeric was elevated to the throne and House Cumberland became the second royal dynasty of Wayrest.
The new King Emeric of Wayrest had been courting the daughter of King Ranser of Shornhelm, but in 2E 566 he married Princess Maraya of Sentinel. This nearly brought down the first Covenant when Ranser, who felt betrayed, launched a surprise attack on Wayrest. The kings of Camlorn, Evermore, and Daggerfall all sided with Wayrest, and Emeric’s superior diplomacy brought the armies of Sentinel into the fray to protect Emeric’s queen. Furthermore, Emeric reached out to a great clan of Orcs in Wrothgar and offered them Orsinium in return for aid. Shornhelm was defeated and the Covenant was reborn: not as a mere Breton defensive pact, but as a new, multinational alliance.
The conclave that negotiated the alliance lasted for months, with argument and debate at every turn. The final result was the child of King Emeric’s vision, made manifest in dozens of compromises and carefully negotiated provisions. Freedom of trade was guaranteed throughout the region, and over the objections of the nobles of Rivenspire and the Crown Redguards of Alik’r, the Orcs were accepted as full members of the alliance. Eventually, all the city-states of northwest Tamriel swore fealty to the Covenant’s Royal Council, presided over by High King Emeric. As the architect of the alliance, he claimed supreme leadership.
So this is the modern Daggerfall Covenant, an alliance of the Redguards of northern Hammerfell, under King Fahara’jad; the Orcs of the mountainous northeast, under King Kurog of Orsinium; with the Breton King Emeric of High Rock presiding from his palace in Wayrest. At its best, it is a noble alliance of honorable and chivalrous peoples, representing all the best aspects of the First and Second Empires. And from this solid foundation, perhaps a third, even mightier Empire shall arise, providing all the peoples of Tamriel the benefits of mutual respect, vigorous trade, and reverence for the Divines.
Schemes Of The Reachmage Lorebook
| Collection: | Glenumbra Lore |
| Location(s): | Glenumbra |
| Location Notes: | This lorebook is located in vicinity of Red Rook Camp, southern Glenumbra, north of Deleyn’s Mill Wayshrine. |
| Image walkthrough: | Loc.1 – Just south of Red Rook Camp in one of their tents. Lorebook is inside that tent with a quest objective as well. |
| Map: | |


Lorebook text
By Gabrielle Benele, Wizard
As the official Mages Guild representative to the Lion Guard’s efforts to stop the Reachmage known only as Angof the Gravesinger, I have decided to record my findings and speculations in case anything untoward happens to me while I’m out in the field. Who knew that the work of the Mages Guild could be so dangerous or so exciting? Anyway, this is accurate and up to date as of the time that I write this. Anything that turns out to be proven false or revealed at a later date I’ll have to deal with in a later volume. Unless I can devise a spell that automatically updates my writing—no, no, I need to focus on one thing at a time!
Angof has a number of associates helping him to complete his plans. I think he calls them "Minions." Let’s review the ones I suspect to be working with this vile necromancer.
Faolchu, who seems to be associated with were-creatures and has launched an assault on Camlorn, appears to me to be following the orders of a more-powerful individual. I believe that individual to be Angof, but I have no proof of this connection as yet.
The Bloodthorn Cult obviously has ties to Angof. Whether he leads the cult or is simply a member I haven’t yet determined, but I’m positive that the two are connected. The cultists scour the land for relics and items of power, and they seem to count a large number of necromancers as part of their order. I wouldn’t be surprised if they had ties to some Daedric Prince or other. Molag Bal, if I had to hazard a guess.
Daedra, too, appear to be arrows in Angof’s quiver. He casts them out into the world as a farmer throws seeds into the wind. I’m sure there are more of Angof’s minions hiding in plain sight, but anything else I put forth at this point would be beyond pure speculation. Instead, let me turn to what I have discovered about the Reachmage himself.
First, he seems to be poisoning the land in some way. The vile vines that grow wherever he has passed demonstrate how his foul magic pollutes the countryside. His very name—Gravesinger—speaks to his fascination and fluency with death magic. Death and decay are his domains, and he seeks power over life and death.
His followers consider him a strong and persuasive leader. Many of them would literally die to please him. Such devotion isn’t healthy, and I find it more than a little scary that someone could have such an effect on people.
Angof seeks to cause as much chaos and mayhem as possible. Beyond that, I’m not sure of his ultimate motives. Has he come to Glenumbra to conquer us or destroy us? And in the end, does that distinction even matter? All I know is, we have to find a way to stop him. We have to!
Well, I’ll have to pick this up again at a later date. Now I have to head out and meet up with the Lion Guard at their redoubt near Cath Bedraud. Let’s see if I can apply the knowledge that I’ve gathered to the task at hand.