A Breach Beyond the Crags is the ninth quest in the Psijic Order quest line in Elder Scrolls Online. While trying to finish it, you’ll have to find six time breaches in Craglorn. Completing it will allow you to reach the last level of the Psijic Order, and unlock the fourth part of the Psijic Sage achievement/trophy, called Psijic Chronologer. If you get stuck at some point, our ESO Craglorn time breach locations guide will help you.
Search Results for: craglorn
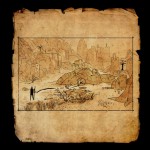
Craglorn Treasure Map Guide
Craglorn is the first adventure zone available for Veteran Rank players. In this zone, players can acquire 5 treasure maps.
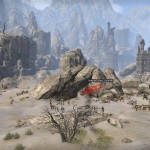
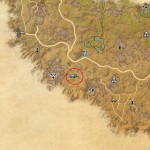
Craglorn Treasure Map I
- In the southwestern part of the Craglorn map
- Use Sandy Path Wayshrine and head south towards Taborra’s Camp.
Screenshot Walkthrough
Upper Craglorn Skyshards
 With the release of update 4 on the PTS and the appearance of a new zone (or rather an expansion of an old zone) Upper Craglorn, we decided it is time to update our Skyshards locations map with new data. There are 6 new skyshards to be found in Upper Craglorn. This goes in line with two new Veteran ranks (6 skyshards = 2 skill point – one for each level) being obtainable in this update. As with all other Craglorn Skyshards they are located in group delves so bring along some friends or be ready to sneak past some rather nasty mobs. To help you achieve this we created screenshot guides for each new skyshard. You will notice that we put Upper and Lower Craglorn Skyshard guides onto one page. This is because new in-game map of Craglorn contains both parts of the zone, although skyshards themselves are separated in the achievements list to Lower and Upper Craglorn sections. You’ll just have the convenience of having everything in one place while hunting for Craglorn Skyshards.
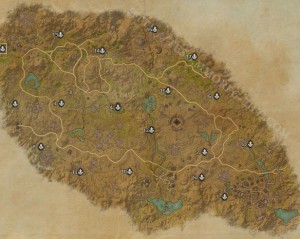
ESO Craglorn Skyshards Location Map
Craglorn is a Veteran Rank zone that became available to all ESO players with Content patch 1.1. This zone is filled with group oriented challenges that require you to travel with VR 10+ friends in order to accomplish anything meaningful in the zone. Same goes for twelve Skyshards scattered around Craglorn’s dungeons. Shards are usually guarded by Veteran rank 11 mobs or even worse, dungeon bosses. Mind you, these are not your regular solo dungeon or public dungeon bosses. For some of these you will need an experienced VR10+ group to take them down and collect the skyshard. Shadow nightblades are at a clear advantage if getting collectibles is your thing. We hope our screenshot guides for each Craglorn Skyshard bellow will help you obtain them easier (we included a few tips on how to avoid the nastiest encounters).
1.
Lava flows where Ayleids walked.
Guide:
Achievement: Lower Craglorn Skyshards.
Inside the Molavar dungeon, southeastern Craglorn. South-southwest of Elinhir Wayshrine, west of Elinhir, there is Magical Anomaly north of the entrance.
Inside the Molavar dungeon, southeastern Craglorn. South-southwest of Elinhir Wayshrine, west of Elinhir, there is Magical Anomaly north of the entrance.
Start at Elinhir Wayshrine and head southwest. When you reach the Magical Anomaly crystal, turn south and follow the path underneath three broken stone gateways leading to the dungeon entrance. The skyshard is on the platform to the right, just as you enter the dungeon, but you will have to circle all the way around to collect it.


2.
In a lair of metal spiders.
Guide:
Achievement: Lower Craglorn Skyshards.
Inside the Rkundzelft dungeon, eastern Craglorn. Northeast of Ogondar’s Winery, east of Spellscar Wayshrine, south-southwest of Lake of Teeth, northeast of Belkarth.
Inside the Rkundzelft dungeon, eastern Craglorn. Northeast of Ogondar’s Winery, east of Spellscar Wayshrine, south-southwest of Lake of Teeth, northeast of Belkarth.
Start in Belkarth and follow the road going east. After you pass Ogondar’s Windery, get off the road and head northeast until you reach the dungeon entrance. Inside, you have to deal with all kind of dwemer constructs. The skyshard is on the stairs, to the right, just as you exit from the northern hallway leading out of the easternmost room in the dungeon.


3.
Among Yokuda’s dead.
Guide:
Achievement: Lower Craglorn Skyshards.
This shard can be found inside Ruins of Kardala dungeon in western Craglorn.
This shard can be found inside Ruins of Kardala dungeon in western Craglorn.
You can approach and enter Ruins of Kardala from south. You can spot the entrance to this dungeon from distance because of a lot of stone pillars standing in front of it. Shard is inside the room with boss Satagna. This room is a dead end on the side of the main hallway and you can easily pass it by as you try and reach the end of the dungeon, so stay alert.


4.
Where sunlight penetrates Dwarven delves.
Guide:
Achievement: Lower Craglorn Skyshards.
This shard can be found inside dungeon Rkhardarhrk in central Craglorn.
This shard can be found inside dungeon Rkhardarhrk in central Craglorn.
You can approach and enter the dungeon from south. There is a small pond outside Rkhardarhrk and a couple of stone pillars to make the approach more unique. Shard is in the northern part of the cave, just before the entrance with two huge stone pillars that have two gas panels.


5.
Where fishmongers sell no fish.
Guide:
Achievement: Lower Craglorn Skyshards.
Inside Haddock’s Market dungeon in southeastern Craglorn. Southeast of Ogondar’s Winery, east of Belkarth.
Inside Haddock’s Market dungeon in southeastern Craglorn. Southeast of Ogondar’s Winery, east of Belkarth.
Start in Belkarth and follow the road going east. After you pass Ogondar’s Windery, get off the road and head south until you reach the dungeon’s entrance. Skyshard is near the northernmost tower, left of the stairs leading into the tower, in front of a statue, next to a tree. The last boss, Ariana At-Fara and her pets, are in front of the tower.


6.
Where chiseled tunnels lead meet crystal caverns.
Guide:
Achievement: Lower Craglorn Skyshards.
Inside the Chiselshriek Mine dungeon, eastern Craglorn. Northwest of Inazzur’s Hold and its Wayshrine, northeast of Mountain Overlook Wayshrine.
Inside the Chiselshriek Mine dungeon, eastern Craglorn. Northwest of Inazzur’s Hold and its Wayshrine, northeast of Mountain Overlook Wayshrine.
Start at Inazzur’s Hold Wayshrine and follow the road northwest. Get off the road and when you reach the crossroads head north until you see the mine entrance. The skyshard is in the northeastern corner of the biggest cave room, partially covered by a rock. The last boss, The Gracious Beacon, is in the middle of the room.


7.
A sea of dunes beneath the earth.
Guide:
Achievement: Lower Craglorn Skyshards.
Found in western Craglorn inside Buried Sands dungeon.
Found in western Craglorn inside Buried Sands dungeon.
You can approach and enter Buried Sands from east. When you enter the dungeon it soon becomes clear from where this shard got its lorebook hinte. There are only a couple groups of mobs between the entrance and the shard. They are rather large though and this makes them hard to solo. Shard is at the northernmost part of the cave. You can find the final boss just south of it.


8.
Under Centurion guard.
Guide:
Achievement: Lower Craglorn Skyshards.
Located inside Mtharnaz dungeon, western Craglorn.
Located inside Mtharnaz dungeon, western Craglorn.
You can approach Mtharnaz entrance from west. Due to its unique grey color, ancient fortress look, and the fact that it is coming out of the rocky mountains, you can spot it from afar easily. Collectible is found in the southeast corner of the first larger room of Mtharnaz. There are a couple of Dwemer constructs defending it. One of the easiest shards to obtain in Craglorn.


9.
At the head of the class.
Guide:
Achievement: Lower Craglorn Skyshards.
Inside the Balamath dungeon, southeastern Craglorn. North-northeast of Elinhir Wayshrine, northwest of Trial: Aetherian Archive, south-southeast of Inazzur’s Hold Wayshrine.
Inside the Balamath dungeon, southeastern Craglorn. North-northeast of Elinhir Wayshrine, northwest of Trial: Aetherian Archive, south-southeast of Inazzur’s Hold Wayshrine.
Start at Elinhir Wayshrine and head north until you reach the Magical Anomaly crystal. There is a short, narrow, passage across the river leading to the dungeon entrance. Skyshard is in an open area, just as you get out of the hallway. There are benches on the left and a vault entrance to the right, with the skyshard located above it.


10.
In the grotto of snake-women.
Guide:
Achievement: Lower Craglorn Skyshards.
Shard at this location can be found inside dungeon – Zalgaz’s Den, southern Craglron.
Shard at this location can be found inside dungeon – Zalgaz’s Den, southern Craglron.
Dungeon entrance is easily spotted from a nearby road. Shard inside Zalgaz’s Den is found in northern part of the cave, close to dungeon’s bosses. Although the first part of the dungeon consists of mobs that are not hard to solo, group of mobs close to the shard poses a serious challenge if you plan on taking them on solo. You can perhaps kill the mob closest to the shard and when you get overwhelmed respawn and pick up the collectible.


11.
Beyond the pillar of hunger.
Guide:
Achievement: Lower Craglorn Skyshards.
Tombs of the Na-Totambu is the dungeon hiding this skyshard and it can be found in southwestern Craglorn.
Tombs of the Na-Totambu is the dungeon hiding this skyshard and it can be found in southwestern Craglorn.
You can approach the hidden entrance of this dungeon from north. There is a small bridge southeast of a nearby wayshrine, that you need to walk over in order to reach Tombs of the Na-Totambu entrance. As soon as you enter the dungeon, you can look to your left and spot the shard. In order to collect it you need to reach the very end of the dungeon. Soloing your way toward the shard is hard, and you are likely to get killed couple of times if you try to do so (that is if you do not play as a stealthy nightblade). Shard is at the end of a small tunnel, just behind the dungeon boss – The Hungry Pillar.


12.
Howling at the moon.
Guide:
Achievement: Lower Craglorn Skyshards.
Inside the Hircine’s Haunt dungeon, central Craglorn. Northwest of Spellscar Wayshrine, southwest of Spellscar, north-northwest of Belkarth.
Inside the Hircine’s Haunt dungeon, central Craglorn. Northwest of Spellscar Wayshrine, southwest of Spellscar, north-northwest of Belkarth.
Start at Belkarth Wayshrine and head north, following the left river bank. After some time you will reach a wooden door, slightly above the river, that will lead you inside the dungeon. You can see the skyshard on the top of the cliff across the entrance as soon as you enter, but you will have to fight your way around the dungeon to reach that location. You can also check our Hircine’s Haunt video, which can help you to successfully finish this dungeon.


13.
In the nesting grounds of scales and deceit.
Guide:
Achievement: Upper Craglorn Skyshards.
Like any other Craglorn skyshard, this one is found inside a Group Delve – Serpent’s Nest in this case. You can find it in northwestern Craglorn, west of Trial: Sanctum Ophidia
Like any other Craglorn skyshard, this one is found inside a Group Delve – Serpent’s Nest in this case. You can find it in northwestern Craglorn, west of Trial: Sanctum Ophidia
Soloable: No.
There is more than one group you have to skip/kill in order to reach the skyshard’s location. Shard is located at the central part of the cave. You can reach this point of delve when you turn left at the crossroad that takes you to the last cave room in southwestern Serpent’s Nest. Skyshard is defended by couple of veteran level 13 Snakes and one Troll.


14.
Overlooking a valley of serpents beneath glimmering falls.
Guide:
Achievement: Upper Craglorn Skyshards.
Found inside Loth’na Caverns Dungeon Delve. This Delve is found in northwestern Craglorn, just southeast of Trial: Sanctum Ophidia.
Found inside Loth’na Caverns Dungeon Delve. This Delve is found in northwestern Craglorn, just southeast of Trial: Sanctum Ophidia.
Soloable: Yes (only one/two groups on your way to the shard).
Once you enter the delve you should pass by the first group of veteran level 13 creatures. Keep to your left. Soon enough you come across a small wooden bridge. You don’t want to cross the small river here as there is a group of creatures defending the bridge. Follow the river upstream. Cross the river and collect the Shard.


15.
Among the treasures of the Iron Exarch.
Guide:
Achievement: Upper Craglorn Skyshards.
Exarch’s Stronghold delve is where you want to go to obtain this shard. It is found in northern Craglorn. Follow the river that flows through central Craglorn to its northern part to enter this part of the map.
Exarch’s Stronghold delve is where you want to go to obtain this shard. It is found in northern Craglorn. Follow the river that flows through central Craglorn to its northern part to enter this part of the map.
Soloable: Yes (need to pass by one group of mobs)
The first and only group you have to dodge/kill is the one at the start of the delve. This group is near the door that takes you to the first long cave bridge. As you go through it and just after couple of steps, look to your right. At the bottom of the cave is the collectible.


16.
Beneath the tower on the ridge.
Guide:
Achievement: Upper Craglorn Skyshards.
To enter Ilthag’s Undertower delve (which contains the skyshard) you will have to
find a basement door in a ruined tower just east of Valley of Scars Wayshrine (Northeast of a nearby lake).
To enter Ilthag’s Undertower delve (which contains the skyshard) you will have to
find a basement door in a ruined tower just east of Valley of Scars Wayshrine (Northeast of a nearby lake).
Soloable: No (there are a lot of groups between its location and delve’s entrance/exit. There is also a whole group standing near the shard).
Once you enter the delve, jump into a gap found on floor. This takes you to the lower part of the dungeon. There are large numbers of enemy groups found here. Run/fight/stealth your way to the northern part. There are stairs you can use to climb up out of this lower part of the cave. When you go through a small passage that connects the lower and higher part of the cave you can spot the shard easily. It is on a small wooden platform. It is also guarded by a large group of mobs.


17.
Amidst howling winds and restless tombs.
Guide:
Achievement: Upper Craglorn Skyshards.
Found in dungeon delve – The Howling Sepulchers, northeastern Craglorn.
Found in dungeon delve – The Howling Sepulchers, northeastern Craglorn.
Soloable: Yes (there are not enemy groups near shard, but you have to reach it).
Shard inside Howling Sepulchers dungeon delve is on a rock just above the first wooden bridge. Its location is really close to an entrance/exit. This fact doesn’t help us at all as we need to go around the dungeon, crossing three bridges in order to reach its location. As it happens there are many groups on this road, expect lots of troubles.


Turn left when you cross it. From this location you can spot another wooden bridge in the distance that you should cross over.

We are now in the small cave with only one mob. Veteran Rank 13 Rosathild. Head east and exit the cave.


18.
Clutched within the jaws of the stone serpent.
Guide:
Achievement: Upper Craglorn Skyshards.
Found in dungeon delve Fearfangs Cavern, west of town Dragonstar, northwestern Craglorn.
Found in dungeon delve Fearfangs Cavern, west of town Dragonstar, northwestern Craglorn.
Soloable: Yes (there is a veteran rank 13 boss Sepilisk near the shard. It is highly possible you need at least his veteran rank in order to collect the shard without alarming Sepilisk).
On your way to the shard you can find many groups of enemies with their snake friends. These groups are found in small rooms full of bookcases. Who knew snakes like to read. Largest of them all – boss Sepilisk – guards the shard in central cave room. You can, however, go around Sepilisk and collect the shard without too much trouble. Be careful though, because when I did it I was VR14, so it might be more difficult for lower levels to bypass the boss without alarming him.


Craglorn preview part 3 – Hircine’s Haunt dungeon
Beside open world events and quests that you can do with passer-byes in the new zone of Craglorn there are also group dungeons available that are instanced and that have tough bosses at the end of each dungeon. These dungeons are instanced for your group (as far as I know) and trash mobs do not represent much of a challenge for a well organised group of veteran rank 9+ players, but bosses could prove to be extra tough without proper usage of tactics. This kind of challenge is what my biggest impression I took away from from playing through the new zone. Complicated group challenges that reward you with satisfaction of beating something with your friends and getting epic item rewards while doing it.
Dungeon we visited on the Public Test Server is called Hircine’s Haunt and it is comparable in size to regular public dungeons in other zones. It has a lot of trash mob groups with 8+ mobs in each group. If you are looking for other types of content you’ll be able to find in Craglorn please check out parts 1 and 2 of our Craglorn video previews.
Craglorn preview part 2 – Anka-Ra Burial Site
There are several types of content you will come across in the new zone Craglorn, upcoming with ESO patch 1.1. You have these events, similar to dark anchors in other zones, that you can repeat and attempt with random passer-byes. You also have various quests that you can do on daily basis. Public and solo dungeons are replaced with dungeons that require a full group to finish and have very hard bosses at the end. There are also trials for the most hardcore groups of 12 to conquer. In our previous preview of Craglorn we showed you one of the repeatable open world events called Magical Anomaly. We managed to do that content with a group of four VR9 players.
In the video bellow you can see another repeatable event type called Anka-Ra Burial Site. Your goal is to protect the NPC, performing a ritual, from waves of different mobs. In the video you will see each of the waves and their mechanics along with what happens in the end. We did not manage to complete this event with a group of 3 adventurers. We lacked in DPS. I believe a fourth member would be enough to get us through the whole thing.
Each of these events and POIs give a lot of Veteran Rank points and I believe it will be a great way for people to level through the last veteran ranks. Afterwards, they can do the hardest group content in the game. Craglorn, as a whole, is a wonderful place to spend your end-game time in. Challenging, with lots of great mechanics and all requiring group efforts, we think this is the end game content Elder Scolls Online deserves.
Craglorn Video Preview – Magical Anomaly
Craglorn is a new zone people will be able to experience in Elder Scrolls Online and it is coming with patch 1.1. Patch is currently live on the Public Test Server and we had the privilege of seeing some of the new content. We wanted to share some of our experiences with the rest of the ESO community and bellow you can view a video showing one of the repeatable Points of Interest called Magical Anomaly.
Craglorn is a zone entirely designed for groups of Veteran Rank 9 or higher players. You can attempt doing this at a lower level, but I guarantee that this will be a big challenge. Almost none of the mob groups are soloable, because they come in large groups (4+) of veteran 11 monsters. If you decide to venture into Craglorn you better bring some friends along. In return you will be rewarded with some of the most exciting group content in the game. There are several types of encounters and quests you will be able to do scattered around the zone. One of such POIs are Magical anomalies with a crystal in the center that needs to be destroyed. Once attacked, waves of mobs will spawn in an attempt to protect the crystal from destruction. You have to fight of these waves while trying to destroy the crystal. There are other similar events available in the zone and we’ll publish more videos showcasing them. If you have any questions about new content or want us to record anything special we’ll be more than happy to oblige. Just leave a comment in the comment section bellow and we’ll try and accommodate you. NOTE: All of this is still in beta and things might change by the time patch gets released on the live server so take all this with a grain of salt.
ESO Craglorn Beta Skill Calculator (patch 1.1)
Elder Scrolls patch 1.1 that will introduce a new zone Craglorn is currently in beta testing on the Public Test Server (PTS). Patch introduces a lot of bug fixes and changes to current skills. We wanted to give a picture of what the players can expect with this patch by providing you with a skill calculator for all classes with updated skill numbers/descriptions. Bellow you will find the skill calculator to help you browse through updated skills (click on the buttons to see the calculator for different classes), but we also compiled a list of changes we manged to see while building the calculator. We couldn’t gather all the changes so best use our live ESO skill calculator in parallel with the one bellow to see all the changes for yourself. Let us know what you think about the changes in the comment section at the bottom of the article.
NOTE: These changes are in BETA testing. All of this is just preliminary and might change by the time the patch goes live. Do not take these for granted. These are here just for the community to analyze.
NOTE 2: All skill values in the calculator are calculated based on the following character values: 500 Magicka, 500 Stamina, 30 Weapon damage, 30 Spell damage.
Skill changelog is bellow the calculator so scroll down the page to read the changes
Click here to use the Craglorn PTS skill calculator and read the full skill changelog
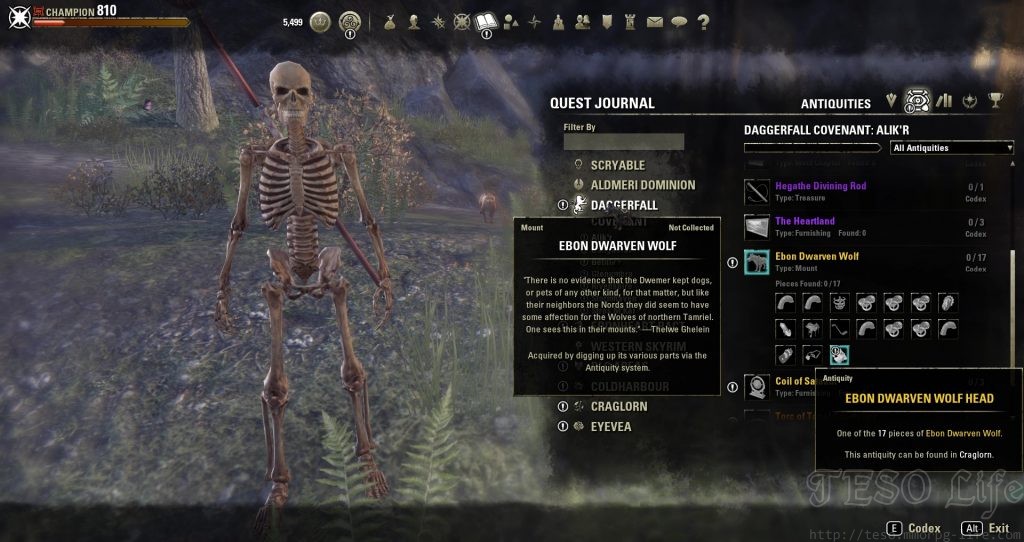
Antiquities Leads Locations & Hidden Entry Relics
Elder Scrolls Online antiquities leads locations and hidden entry relics are new things that have come with the Greymoor expansion. The new and fun Antiquities system offers players a minigame, where they first find a lead for an item, and then excavate it. These leads have different-colored rarities, and their progress can be monitored from the Antiquities tab. At first, you can only see them as hidden entries, but once you find and take one of the leads, you can check your progress. The guide below reveals all the hidden lead entry names and their locations.
Horns of The Reach Now Available on Playstation 4 & Xbox One
Horns of the Reach is finally out on Playstation 4 and Xbox One. After a two week exclusivity period on PC, console players are getting to enjoy the two new dungeons as well. If you’re an ESO Plus subscriber, you’ll get the new content automatically. If not, you’ll have to buy it from the store – it’s being sold for 1500 Crowns.